


This guide will explain how to create mailing labels in Excel.
We can connect an Excel table with our mailing list to a Microsoft Word document using the Word’s Mail Merge feature. Importing a mailing list from Excel will allow the user to save time creating mailing labels.
A mailing label is an adhesive label that can be placed on an envelope or package. The label shows an address block that usually includes the sender’s full name and address.
If you want to create your own mailing labels, you might find it tedious to create each address block manually. Creating mailing labels manually may also leave the output vulnerable to human error.
The Mail Merge function in Excel can help the user create mailing labels. This function links an Excel spreadsheet to a Microsoft Word document.
The Word document is used as a template for the labels, and the Excel spreadsheet is used to provide the data for the labels.
Let’s take a look at a simple example where we can use the Mail Merge function to generate mailing labels quickly.
Suppose you have an Excel spreadsheet with a mailing list of 25 people.
You want to create mailing labels from the recipients indicated in the mailing list. How can we do this in Excel?
Excel does not have a built-in mailing label function. However, it can still be used as a data source for Microsoft Word’s powerful Mailing features.
Word’s Mailing tab allows you to select an Excel document as a source for your mailing list. Microsoft Word also makes it easier for users to match each column in the Excel sheet with different elements in the address block.
You should now know better when to use the Mail Merge function to create mailing labels in Excel. Let’s see how this works on an actual sample spreadsheet.
A Real Example of Creating Mailing Labels in Excel
The following section provides several examples of how to create mailing labels in Excel. We will also go into detail about the formulas and tools used in these examples.
First, let’s take a look at a sample mailing list stored in an Excel sheet.
The spreadsheet below contains a mailing list of 25 recipients. Our data includes fields such as first name, last name, and street address.
When we connect our Word document to our Excel data, we can create an output similar to what you can see below.
Do you want to take a closer look at our mailing list? You can make your own copy of the spreadsheet above using the link attached below.
If you’re ready to try out creating mailing labels in Excel, head over to the next section to read our step-by-step breakdown on how to do it!
How to Use the Create Mailing Labels Function in Excel
This section will guide you through each step needed to create mailing labels in Excel. You’ll learn how to use the Microsoft Mail Merge tool to import mailing list data from an Excel spreadsheet.
Follow these steps to start creating mailing labels in Excel:
- First, we must set up our mailing list in an Excel spreadsheet. The Excel mailing list data must have headers. For example, the column that holds the recipient’s last name has the header ‘last_name’ in the first row.

- Create a new Microsoft Word document. In the Mailings tab, click on the option Start Mail Merge.

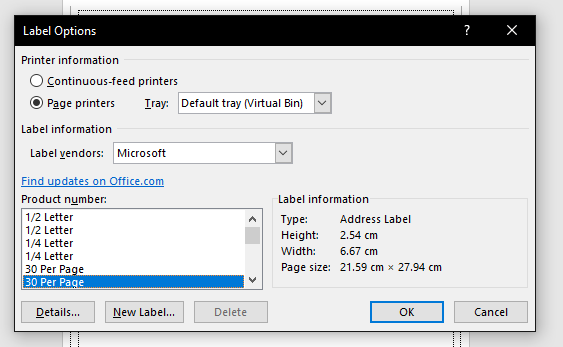
- In the Label Options dialog box, select the type of label format you want to use. In this example, we’ll select the option with the product number ‘30 Per Page’. Click on OK to apply the label format to the current document.
- Next, we’ll have to connect our current document with our Excel mailing list. In the Mailings tab, click on the Select Recipients option.

- In the drop-down menu, click on the option Use an Existing List.

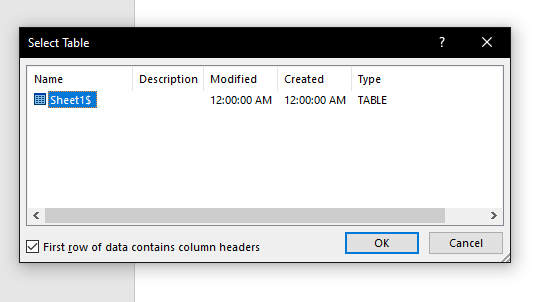
- Microsoft Word will present a File Explorer dialog box. Select the Excel file with the mailing list data. Once you’ve selected the correct file, Word will ask you to specify which table to use. In this example, our table can be found in Sheet1. Check the option labeled ‘First row of data contains column headers’.
- Next, we’ll adjust the address block settings to use the right fields from our Excel table. In the Mailings tab, select the Address Block option.

- In the Insert Address Block dialog box, you can preview what the address block looks like currently. The preview can help you identify any missing or incorrect data. For example, the preview seen below fails to show the postal code from our mailing list. We can fix these issues by selecting the Match Fields option.

- The Match Fields dialog box will help you identify which columns in your mailing list are being displayed in the address block. In the example below, we manually set the Postal Code field to retrieve data from the postal_code column. Click on OK to apply any new changes.

- In the Mailings tab, click on the Update Labels option.

- Once our address block shows the correct data, we can finish the merge. In the Mailings tab, click on the Finish & Merge option. Select the Edit Individual Documents option to add the address blocks to the mailing label template.

- You should now have a Microsoft Word document with the necessary mailing labels.

These are all the steps you need to create a mailing label in Excel.
This step-by-step guide is a quick introduction to using Mail Merge with Microsoft Excel.
Creating mailing labels is just one example of the many Excel features you can use in your spreadsheets. Our website offers hundreds of other functions and methods to help you get more out of Microsoft Excel.
With so many other Excel functions available, you can find one appropriate for your use case.
Don’t miss out on our team’s new spreadsheet tips, tricks, and best practices. Subscribe to our newsletter to stay updated on the latest guides from us!


