This guide will discuss how to calculate tenure in Excel using three simple and efficient methods.
Excel is an excellent tool to use for different situations and purposes. Since it has built-in functions and tools, it makes calculations and manipulating data easier and simpler.
Furthermore, Excel is a popular tool used in business. For instance, we can easily calculate an employee’s tenure in Excel using several built-in functions. So tenure is a term often used to refer to an employee’s employment.
Essentially, it refers to the service period of an employee for any specific employer. And this is an important concept often used in business and human resources to keep track of the service period of employees in a company.
Let’s take a sample scenario wherein we need to calculate tenure in Excel.
Suppose you are working as an HR manager in a company. And you were asked to update the employee records. So you need to update and calculate the tenure of each employee. To make this work easier, you opted to create a formula using different built-in functions in Excel.
And there are many different situations or purposes when calculating tenure in Excel. For instance, we can calculate the tenure with dynamic dates, meaning we want to get an employee’s tenure from their joining date to the present day. So this will be updated each day since it will add a day to their tenure.
Secondly, we can also calculate the tenure for a fixed date, meaning the joining date and the employee’s leaving date. So this is mostly used for ex-employees who have already left the company.
Lastly, we can calculate the tenure to have the year-months format. Since we have calculated the tenure in months, we can also include the year to display the tenure in a month-year format to be more specific.
Before we move on to discuss the three methods of how to calculate tenure in Excel, let’s first understand the different functions we will be using to calculate tenure in Excel.
The Anatomy of the DATEDIF Function
The syntax or the way we write the DATEDIF function is as follows:
=DATEDIF(start_date, end_date, unit)
Let’s take apart this formula and understand what each term means:
- = the equal sign is how we start any function in Excel.
- DATEDIF() is our
DATEDIFfunction. And this function is used to calculate the number of days, months, or years between two dates. - start_date is a required argument. So this refers to the date that represents the starting date of a given or selected period. Additionally, the dates can be inputted as text strings enclosed in quotation marks, as serial numbers, or as results of other formulas or functions.
- end_date is another required argument. And this refers to the date that represents the last date or ending date of the time period.
- unit is also a required argument. So this is the type of information that we want to be returned. For instance, “Y” is years, “M” is months, “D” is days, and we can combine any two to return years-months or months-days.
The Anatomy of the AVERAGE Function
The syntax or the way we write the AVERAGE function is as follows:
=AVERAGE(number1, [number2])
Let’s take apart this formula and understand what each term means:
- = the equal sign is we begin any function in Excel.
- AVERAGE() refers to our
AVERAGEfunction. And this function is used to return the average or arithmetic mean of its inputted arguments which can be numbers or names, arrays, or cell references that have numbers. - number1 is a required argument. So this refers to 1 to 255 numeric arguments that we want to average.
- number2 is an optional argument. And this is a supplement to number1 and refers to other numeric arguments we also want to average.
Great! Now we can move on and dive into the three simple and easy methods of how to calculate tenure in Excel.
How to Calculate Tenure in Excel for a Dynamic Date
Firstly, we can calculate the tenure for a dynamic date in Excel. Let’s say we have a data set containing the employee’s starting date, meaning the date they started working for the company.
So our formula would combine the DATEDIF function and the TODAY function. Firstly, we will select the cell containing the starting date. Then, we will use the TODAY function to get the current date which will act as the end_date in our formula.
After, we will specify the format of the return value as M, meaning we want the number of months as tenure. Lastly, we can use the AVERAGE function to determine the average tenure within the data set.
1. Firstly, we will create a new column to input the results. Then, we will type in the formula “=DATEDIF(C2, TODAY(), “M”)”. Lastly, we will press the Enter key to return the result.

2. Secondly, we will drag down the Fill Handle tool to copy the formula to the other cells.

3. Thirdly, we will type in the formula “=AVERAGE(D2:D6)” to get the average tenure.

4. And tada! We have successfully calculated tenure in Excel for a dynamic date.

How to Calculate Tenure in Excel for a Fixed Date
Secondly, we can calculate tenure in Excel for a specific date. In this case, we are referring to ex-employees that have a starting or joining date and a leaving or ending date. In this case, we have a data set containing the starting date and leaving date of an employee.
So we will simply apply the same formula as the previous method. However, we won’t be using the TODAY function since we already have an end date.
1. Firstly, we will create a new column to input the tenure. Then, we will type in the formula “=DATEDIF(C9,D9,”M”)”. Lastly, we will press the Enter key to return the result.
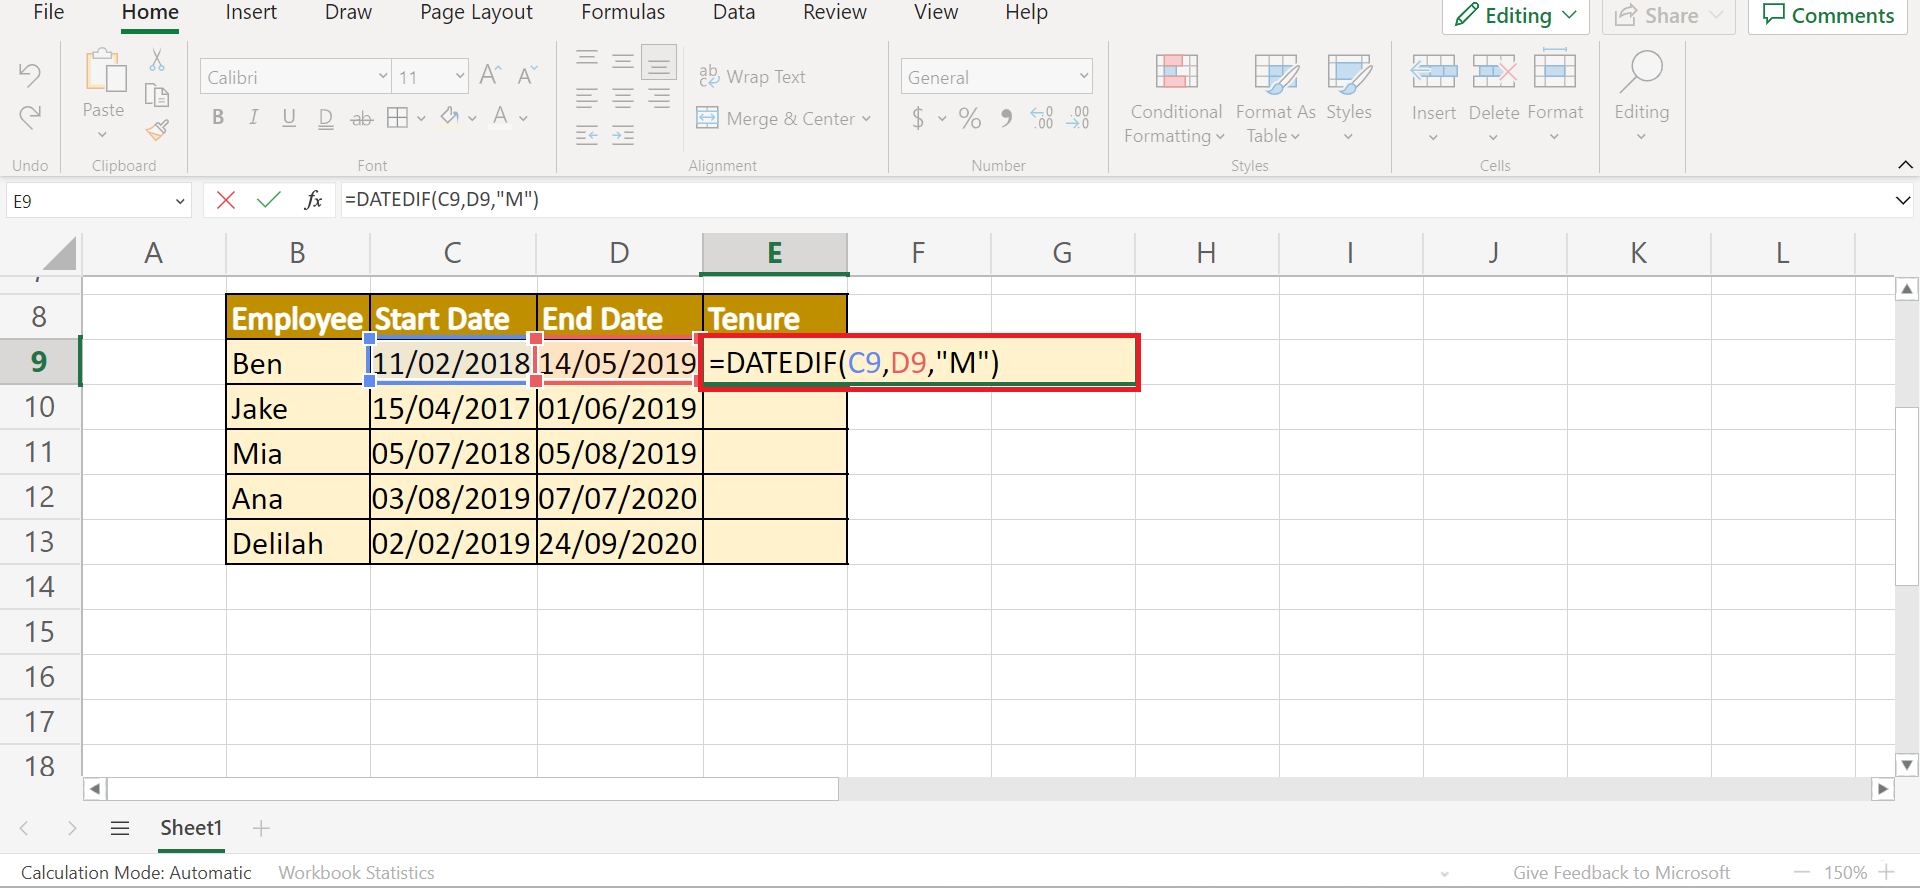
2. Secondly, we will drag the Fill Handle tool down to apply the formula to the other cells.

3. Next, we can calculate the average tenure using this formula “=AVERAGE(E9:E13)”.

4. And tada! We have calculated the tenure in Excel for a fixed date.

How to Calculate Tenure in Excel in Years-Months Format
Lastly, we can get the tenure in a year-month format using the DATEDIF function. In the previous methods, we have only calculated the tenure in months. But, we can also get the tenure in other formats to be more specific.
To do this, our formula will be calculating the difference in years. Then, it will count the difference in months.
1. Firstly, we will create a new column to input the results. Then, we can type in the formula “=DATEDIF(C9,D9, “Y”)&” Y” & DATEDIF(C9,D9,”M”)&” M””. Finally, we will press the Enter key to return the result.

2. Secondly, we will drag the Fill Handle tool down to copy and apply the formula to the other cells.

3. And tada! We have successfully calculated tenure in Excel in a year-month format.

You can make your own copy of the spreadsheet above using the link attached below.
And that’s pretty much it! We have successfully explained how to calculate tenure in Excel using three easy and simple methods. Now you can choose any of the methods to apply in your work whenever you need to determine tenure.
Are you interested in learning more about what Excel can do? You can now use the DATEDIF function and the various other Microsoft Excel formulas available to create great worksheets that work for you. Make sure to subscribe to our newsletter to be the first to know about the latest guides and tutorials from us.