The EDATE function in Google Sheets is useful if you want to know a specified number of months before or after a given date.
Meaning, the EDATE function can be used in identifying the expiration date of contracts, employees’ regularization date, or if you simply want to know the date 6 months ago for some reason.
Table of Contents
The rules for using the EDATE function in Google Sheets are as follows:
- The EDATE function can determine the number of days in a month, this also includes February during leap years
- Make sure that the date you will reference for the EDATE function is either a cell that contains a date, a function that returns a date like DATE(), or an inputted data in a date format that Google sheets can recognize(e.g. 8/15/1989).
- The EDATE function will return the #VALUE error if the start date is not valid date.
Let’s take an example.
My manager provided me a list of employees and their start dates. He asked me to determine when their contracts will end if all of them signed up for 6 months of work. The given data is as follows:

Using the EDATE function in Google sheets, I was able to come up with the contract end dates as shown in column C.
All I did was determine the specific date 6 months after the given dates, in this case, the start date data provided by my manager.
Let’s have another example!
Patrick was asked by his manager to determine the recommended date of renewal for people whose passports are expiring soon. According to Patrick’s manager, the suggested renewal date is 10 months before the expiration. Here’s is the data he came up with:
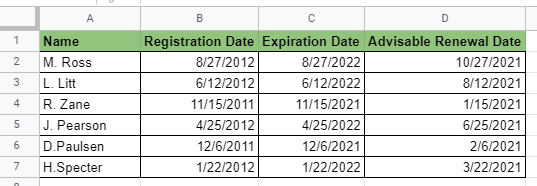
This is a little bit tricky since the only data provided by Patrick’s manager was the names and registration dates.
So Patrick had to determine first the expiration date of the passports as shown in column C. He was able to do this using the EDATE function by determining the date 120 months(10 years) after the registration date, which is the standard validity of passports.
Now, it’s time to figure out what the manager asked for, the recommended renewal date. Patrick came up with the answer by using again the EDATE function to indicate the date 10 months before the expiration date.
Looks easy, right?
Watch out for a more advanced tutorial and examples on how you can use the EDATE function in the coming weeks. Be sure to subscribe to be notified.
Perfect! Let’s begin getting to know more about our EDATE function in Google Sheets.
The Anatomy of the EDATE Function
So the syntax (the way we write) the EDATE function is as follows:
=EDATE(start_date, months)
Let’s dissect this thing and understand what each of these terms means:
- = the equal sign is just how we start any function in Google Sheets. It is how Google Sheets understand that we are asking it to either do computation or use a function.
- EDATE() this is our EDATE function. EDATE will return the date a specified number of months before or after the referenced date.
- start_date is the first argument that will determine the date you want to reference for the EDATE function.
- months is the second argument that determines the number of months before or after start_date to calculate. The before or after will be determined by a negative number if before, or a positive number if after.
A Real Example of Using EDATE Function
Take a look at the example below to see how the EDATE function is used in Google Sheets.

As you can see, the EDATE function was able to return the date May 22, 2020, which is four months, as specified on the second argument of the formula, after the referenced date which is January 22, 2020.
The second result also confirms that the EDATE function in Google sheet can detect the number of days in a month, even if the computation involves a leap year.
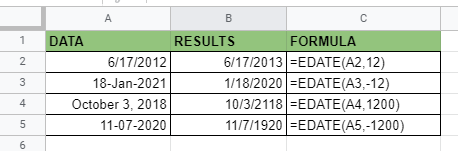
In this next example of using the EDATE function, we showcase the different date formats that the function recognizes.
This includes, but not limited to, (month)/(day)/(year), (day)-(abbreviated month)-(year), (full month name) (day) ,(year), and (month)-(day)-(year).
You can also see that you are not limited to within a year, the EDATE function determines before or after a year, or in the last two examples cases even before or after a hundred years.
You may make a copy of the spreadsheet using the link I have attached below.
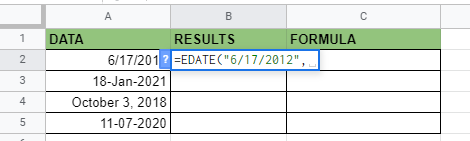
How to Use EDATE Function in Google Sheets
- Simply click on any cell to make it the active cell. For this guide, I will be selecting B2 where I want to show my result.
- Next, type the equal sign ‘=‘ to begin the function and then followed by the name of the function, which is our ‘edate‘ (or ‘EDATE‘, not case sensitive).
- Type open parenthesis ‘(‘ or simply hit Tab key to let you use that function

- Now the fun part! Let’s give our function the first argument, which is the start_date. You may pass constant data by typing the exact date after the parenthesis.
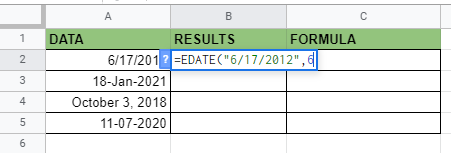
- To let the Google sheet know that we’re done typing our first argument, we should now type in the delimiter or the character that separates each argument on a function. In this case, type comma(,) followed by the second argument, which is the months. Just make sure to use a negative(-) number if you are trying to determine the date before the referenced date.
- Finally, just hit your Enter key or tab. The active cell is now showing you the result or the return value of the EDATE function.

- Notice that in this example, we provided the exact value, constant, as the arguments of our EDATE. Alternatively, these constants can be variable or simply cell addresses of your data.
- Edit your function by changing the first argument into the cell addresses where your start_date is located. In this case, type in A2, and follow it with the 2nd argument, months (6), separated by the delimiter. Lastly, hit the Tab or Enter key.

- Copy the formula down to the remaining rows.

That’s pretty much it. You can now use the EDATE function in Google Sheets together with the other numerous Google Sheets formulas to create even more powerful formulas that can make your life much easier.