This guide will explain how to perform linear programming in Excel using Solver.
We can use linear programming to find the optimal solution for a problem with multiple constraints. We can also convert any linear programming problem into a table in Excel and use the Solver add-in to find the solution.
Linear Programming is a mathematical process that finds a linear function’s maximum or minimum value given certain limitations. We can use linear programming to solve problems in various fields, such as finance and engineering.
One example where Linear Programming may be used is in supply chain management. In this case, the objective is to minimize transportation costs while meeting customers’ demands.
Excel’s Solver add-in is a tool that we can use to find the optimal solution for a linear programming problem. We can use the tool to help us find the cheapest way to transport the goods while still meeting specific customer demands.
Now that we have a grasp on when to use linear programming, let’s see how this works on an actual sample spreadsheet.
A Real Example of Linear Programming in Excel
The following section provides several examples of how to use linear programming. We will also go into detail about the formulas and tools used in these examples.
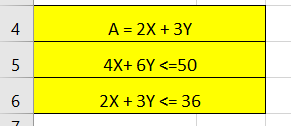
First, let’s take a look at a sample set of equations. The first equation describes how our two variables, x and y control the final output A. The second and third equations provide constraints to the optimal solution.
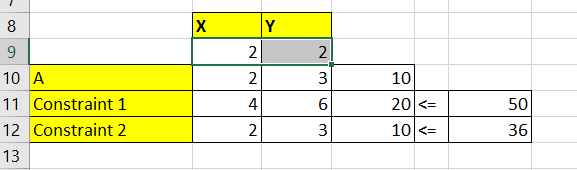
If we want to solve the linear programming problem in Excel, we must convert the equations into a table. Each row in the table corresponds to a specific equation. The cells under the X and Y columns hold the equation’s actual numerical coefficients.
We will also have to create additional cells to help us find our solution. In the example below, we’ve created three cells that evaluate the equation by replacing x and y with actual numbers. For example, if x=5 and y=10, our value for A is 40.

To get the result in cell D10, we just need to use the following formula:
=($C$9*C10)+($D$9*D10)
We can drag the formula down with the Fill Handle tool to also evaluate the constraint equations. In the example below, we could meet the constraints by setting the value of both x and y to 2.
While the value for x and y seen above meet the constraints, it may not be the optimal answer. We still have to consider that our goal is to maximize output A.
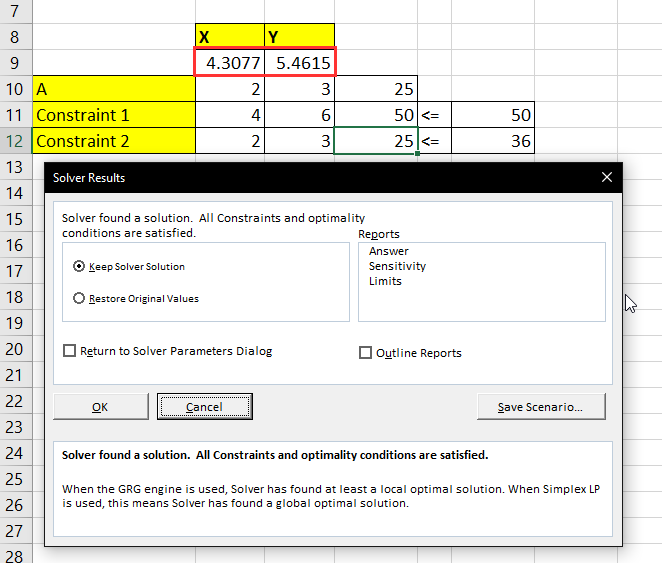
This is where we will need to use the Solver Excel add-in. By changing specific cells in the spreadsheet, we can tell the tool which values to maximize or minimize. In the example below, we’ve also determined that the optimal solution is x=4.3 and y=5.46.
Do you want to take a closer look at our examples? You can also make your own copy of the spreadsheet above using the link attached below.
If you’re ready to try out linear programming in Excel, head over to the next section to read our step-by-step breakdown on how to do it!
How to Use Linear Programming Function in Excel
This section will guide you through each step needed to use linear programming in Excel. First, we’ll learn how to enable the Solver add-in through the Excel Options dialog box. Next, we’ll also explain how to use the Solver to find the optimal solution given a table of coefficients from a linear program.
Follow these steps to start using linear programming in Excel:
-
- In the File tab, click on the Options button on the bottom-left corner.

- In the Excel Options dialog box, head to the Add-ins tab and click on Go.

- Ensure that the Solver Add-in option is checked. Click on OK.

- The Solver add-in will now be accessible through the Data tab.

- Convert your linear programming equation and constraints into a table similar to the one pictured below.

- Create a formula to evaluate the output we want to optimize. In this example, we want to maximize cell E10.

- Ensure that you also have formulas set up for each constraint equation. Our example has formulas set up in both E11 and E12.

- Click on the Solver tool to access the Solver Parameters dialog box. Type the cell you want to optimize in the text box next to the label ‘Set Objective’. Choose whether you want to maximize or minimize the cell. In this example, we want to maximize cell E10.
 Next, we’ll also need to indicate the range of cells the Solver add-in will try to change. In this example, we’ll allow the tool to edit the cell range C9:D9.
 - Click on the Add button to add the first of our constraints. The Add Constraint dialog pop-up will ask the user for the cell to take note and the constraint. The user must also indicate whether the value should not reach above or below the given constraint. In our example, we want E11 to not go over 50.

- You should also perform the previous step for all the constraints needed.
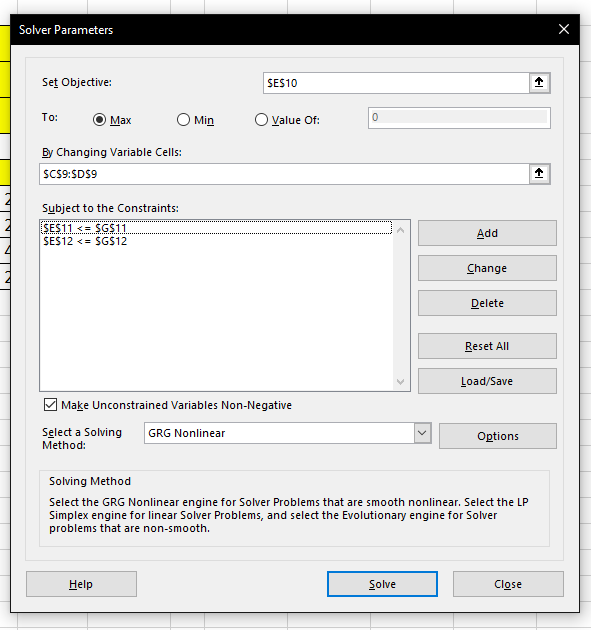
- Click on Solve to allow the add-in to start computing for the optimal solution.

- In the File tab, click on the Options button on the bottom-left corner.
- Once the tool finds the optimal solution, the user can either keep the solved solution or restore the cells to their original values.
This step-by-step guide should provide you with all the information you need to perform linear programming in Microsoft Excel.
We’ve also explained how the Solver add-in can help you find the optimal solution for a given linear programming problem.
The Solver add-in tool is just one of many Excel features you can use in your spreadsheets. Overall, our website offers hundreds of other functions, tools, and methods to help you make the most out of your spreadsheets.
With so many other Excel functions available, you can find one appropriate for your use case.
Don’t miss out on our team’s new spreadsheet tips, tricks, and best practices. Subscribe to our newsletter to stay updated on the latest guides from us!