


This guide will explain how you can protect formulas without protecting worksheets in Excel.
You can protect cells with formulas to prevent other users from changing the contents of these cells. Locking formulas can help prevent users from breaking trackers or tables that rely on multiple formulas to function.
Let’s take a look at a common use case where we need to protect formulas without protecting worksheets in Excel.
Suppose you have a spreadsheet that functions as an expense tracker. The user is free to input new expenses into the sheet while some columns or cells compute or derive other values from user input.
For example, you can have the user input a list of expenses and their corresponding dollar amounts. Another cell contains a formula that computes the total amount spent or indicates which expense is the largest.
Since you want to share the expense tracker as a template, you would like to control which cells the user is allowed to edit. Cells meant for user input should remain editable. Meanwhile, cells that include formulas should be protected. How can this be done in Excel?
We can use cell formatting to indicate which cells are to be locked when protected. Cells with the Locked option in their cell formatting will be uneditable once the sheet owner adds worksheet protection.
This use case is just one way we can take advantage of protecting formulas without protecting the entire worksheet in Excel. This guide should be useful for any sheet that relies heavily on formulas.
We now know when it’s useful to protect formulas without protecting the worksheet in Excel. Let’s take a closer look at an actual sample spreadsheet that uses protected formulas.
A Real Example of Protecting Formulas Without Protecting Worksheets in Excel
Let’s take a look at a real example of an Excel spreadsheet that protects only cells with formulas. Since the entire worksheet is not protected, users should still be able to edit cells that do not contain a formula.
In the example below, we have a spreadsheet that keeps track of expenses. The cells that include a formula are the cells that compute the percentage and the cell that computes the total amount of expenses included in the table.
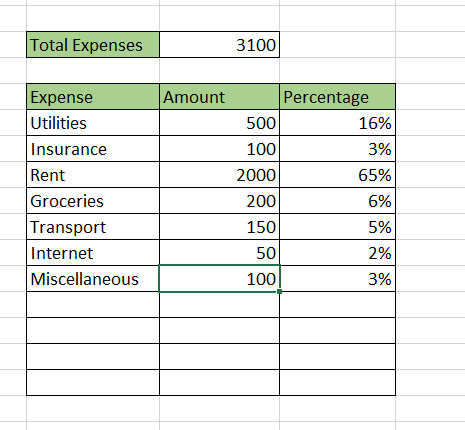
Using cell formatting and the Go To Special tool, we’re able to set up the worksheet so that the user cannot edit the cells that include formulas. The user, however, is still free to add more expenses by filling in the first and second columns.
You can make your own copy of the spreadsheet above using the link attached below.
If you’re ready to protect formulas without protecting worksheets in Excel, follow our guide in the next section!
How to Protect Formulas Without Protecting Worksheets in Excel
This section will guide you through each step needed to start protecting formulas without needing to protect the entire worksheet in Excel. You’ll learn how we can use cell formatting to indicate which cells should be locked. You will also understand how to use Excel’s Go To Special tool to find cells with formulas in them.
Follow these steps to start protecting cells with formulas:
- First, select the entire worksheet by pressing Ctrl + A.

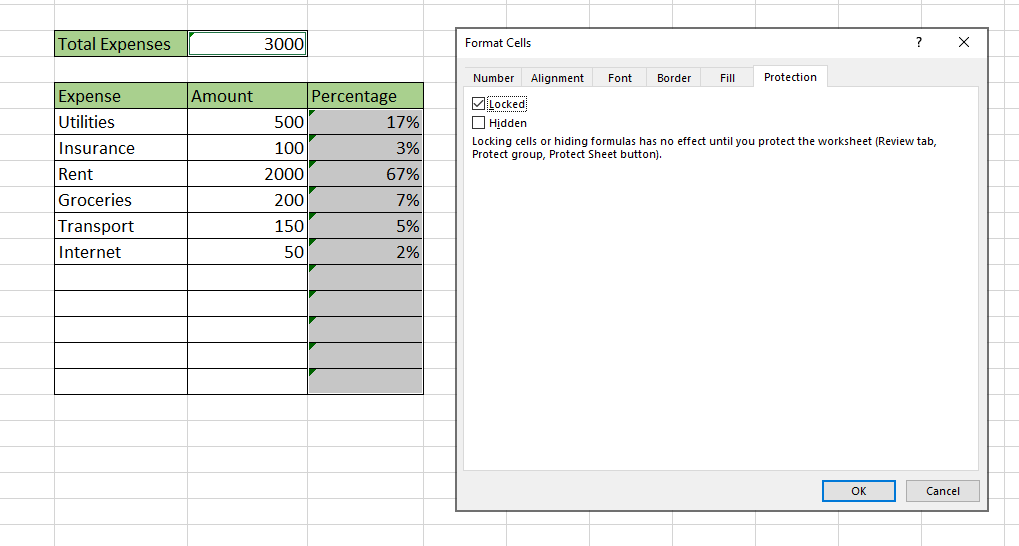
- Once the entire worksheet is selected, we should make sure every cell is unlocked by default. Access the Format Cells dialog by pressing Ctrl + 1. Under the Protection tab, make sure the Locked option is unchecked.

- Next, head to the Home tab. Click on the ‘Go To Special‘ tool under Find & Select.

- The Go To Special function allows the user to select all cells with a property. In this case, we want to select all cells with formulas. This example will also include formulas that return any value. Click on OK to return the selection.

- All cells in your spreadsheet with formulas should now be selected.

- Type Ctrl + 1 again to access the Format Cells dialog box. Head to the Protection tab and check the Locked option. Click on OK to apply these changes.
Since these changes are only applied to cells with formulas, protecting the worksheet will only lock these cells.
- Next, go to the Review tab and click on the Protect Sheet option.

- The Protect Sheet dialog box will ask you to add a password to unprotect the sheet if needed. Check the options for all users to select both locked and unlocked cells. Click on OK to protect the worksheet.

- When you try to edit locked cells, an error pop-up should now appear, warning that the cell is currently locked.

- Users can still edit non-formula cells. In the example below, we can add a new expense category to our expense tracker.
Frequently Asked Questions (FAQ)
- Can we also hide the formula used in a cell?
Besides locking cells, users also have the option to hide the formulas themselves. In the Format cells, check the Hidden option under the Protection tab. If the user protects the sheet, all cells with the Hidden formatting will keep the formulas hidden from view.

This step-by-step guide should be all you need to begin protecting formulas without protecting worksheets in Excel. Our guide shows how easy it is to use cell formatting options to indicate which cells to lock when a worksheet is protected.
Locking specific cells using the Protect Worksheet and cell formatting is just one way you can keep your spreadsheets more secure. With so many other Excel functions available, you can surely find one that suits your use case.
Are you interested in learning more about what Excel can do? Subscribe to our newsletter to find out about the latest Excel guides and tutorials from us.


