


This guide will explain how you can set the rounding precision of numerical values in Excel.
Setting the rounding precision of your sheet allows you to remove any unnecessary decimal values. This will be useful for avoiding precision errors.
When working with decimal values in Excel, users can add formatting to the cells only to show a certain number of values. However, users may want to set these values to take the precision indicated by the current formatting.
Let’s take a look at a quick example where we can apply the rounding precision for decimal values.=
You have a sheet that contains various mathematical constants. The cell holding π may have the decimal value 3.1415926535 but shows up on the spreadsheet as 3.142. Despite having only three decimal places showing, the actual value still remains.
Excel includes the option to set the precision of the values as displayed in the sheet. Performing this action will permanently lose the accuracy of the values and ensure that the actual value of the cell is equal to the displayed value.
This use case is just one reason we may want to set the rounding precision in Excel. Any worksheet involving highly precise decimals may result in floating-point rounding errors. Users can experience a loss of precision when using either very large or very small numbers.
Now that we know when to use this precision option, let’s take a look at how we can use it on an actual spreadsheet.
A Real Example of Setting Rounding Precision in Excel
Let’s take a look at a real example of a spreadsheet that sets the rounding precision to prevent a floating-point error.
In the example below, we’ve set the precision of the cells to follow the precision indicated by the cell’s formatting. Before applying the setting, the cells in column B display up to two decimal places. The values themselves, however, may have a precision higher than two decimal places.

This option affects the active workbook and all worksheets under it. This option cannot be undone, so the user is encouraged to save their workbook before using this option.
You can make your own copy of the spreadsheet seen above using the link attached below.
If you’re ready to try out our method of setting precision in Excel, read the next section to find out how.
How to Set Rounding Precision in Excel
This section will guide you through each step needed to set up the rounding precision in an Excel spreadsheet. You’ll learn how we can use the advanced Excel option to set precision as displayed on the sheet.
Follow these steps to set the rounding precision in Excel:
- First, make sure that all the cells in your spreadsheet are displayed at the intended precision. In the example below, cell B2 has a decimal with a precision of four decimal places. The cell, however, has formatting that rounds the value to two decimal places.

- Once all cells are formatted to the desired level of precision, head to the File tab.

- In the File tab, click on Options to open a new dialog box.

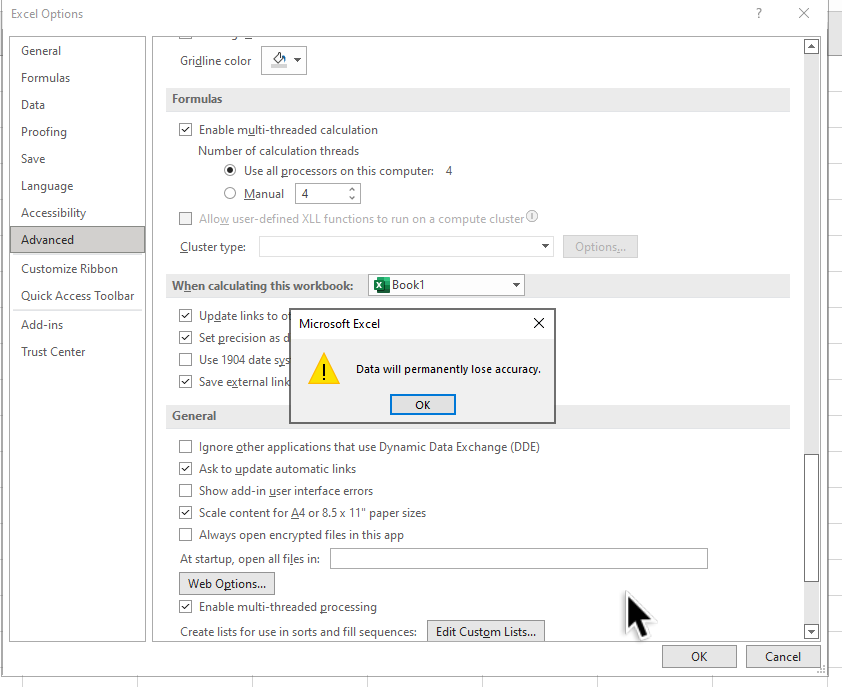
- Navigate to the Advanced menu and look for the section labeled ‘When calculating this workbook’. Check the option labeled ‘Set precision as displayed’.

- Excel will warn you that your spreadsheet data will permanently lose accuracy. If you are okay with this, click on OK.
- Your sheet should now have decimal values that reflect the precision indicated in the cell formatting.
- Every time the user adjusts the cell formatting to display a lower precision, the underlying value of the cell will also change. In the example below, we’ve clicked on the decrease decimal option to remove decimals entirely. Since we’ve changed our spreadsheet settings, the cell values have become integers.

Frequently Asked Questions (FAQ)
-
- Can setting the precision as displayed result in inaccuracies??
Adjusting the level of precision for values has a compounding effect. Your spreadsheet may produce inaccurate data depending on how the spreadsheet uses these values. - What causes floating-point errors?
Numbers that appear exactly in a decimal format may need to be approximated when converted to binary floating-point. Every time a number is converted to binary, some loss of precision is expected.
After calculating between two or more decimal values, Excel rounds the value at some capacity. For example, evaluating the equation =1*(0.5-0.4-0.1) returns a value of -2.78E-17 rather than 0.
- Can setting the precision as displayed result in inaccuracies??
This step-by-step guide should be all you need to set the rounding precision yourself in Excel. We’ve shown you how easy it is to set up a worksheet that adjusts the actual value of cells as it is displayed to the user.
Setting decimal precision is just one example of an advanced option you can find in Excel. With so many other Excel functions available, you can surely find one that works for you.
Are you interested in learning more about what Excel can do? Subscribe to our newsletter to find out about the latest Excel guides and tutorials from us.


