You can use the IF THEN formula in Google Sheets if you need to make logical comparisons.
When evaluating records in Google Sheets, the IF THEN, or simply IF formula is the go-to technique of many users. You can use this formula to perform a logical test on a record and return a specific value depending on whether the test result is TRUE or FALSE.
There are various situations where you can find the IF THEN formula useful. For example, in Accounting, you can use IF THEN to evaluate whether a particular expense record falls within the budget or not. You can also use it to rate numerical datasets, like assessing whether a score passed or failed.
In this article, you’ll learn how to write the IF THEN formula in Google Sheets, as well as how to use it.
Let’s get started!
The Anatomy of the IF THEN Formula
The IF THEN formula is quite easy to implement as it has a very simple syntax. Here’s how you should write it:
- = like in other formulas, the equal sign is the first character you should type in to initiate the
IF THENformula. - IF() this is the
IF THENformula. - logical_expression is the first parameter of
IF THEN. This parameter will hold the condition or logical expression you need to test. - value_if_true holds the value that the
IF THENformula will return if the condition is true. - value_if_false if the condition is not met, the formula will return the value in this parameter instead.
A Real Example of Using the IF THEN Formula
Having learned about the syntax of IF THEN formula, let’s now look at how we can utilize it in a real-world scenario.
Let’s consider this example spreadsheet.
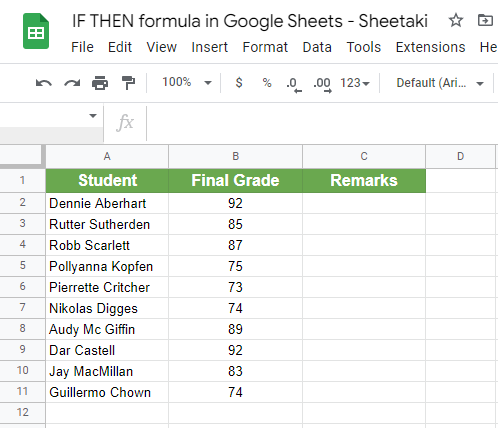
Listed above are the final grades of students in Mathematics. Let’s say we want to determine the students who passed and failed in that subject. Although we can just scan through the data and distinguish the records one by one, it would be inefficient to do this, especially for large datasets.
Here’s where the IF THEN formula can help you. With this formula, you can automate what could otherwise take you so long to do. You can use this formula to instantly evaluate the numerical values in your spreadsheet, just like this one:
That’s pretty cool, right? Let’s find out how it’s done in the next section.
How to Use IF THEN Formula in Google Sheets
In order to gain a better understanding of the IF THEN formula, let’s try out a simple activity. Click on the link below to have a copy of the spreadsheet that we’ll use.
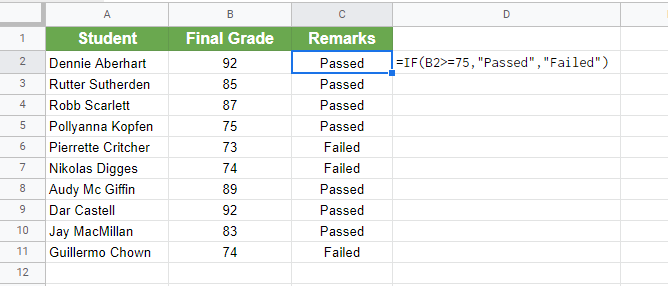
- As you can see, the spreadsheet contains the same dataset in our earlier example. Our objective is to display “Passed” in the Remarks column if the grade is greater than or equal to 75. Otherwise, we’ll mark it as “Failed” instead.

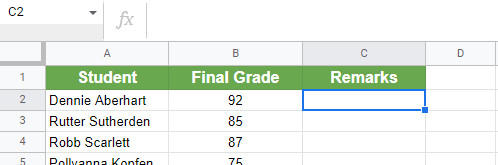
- Let’s start with the first record. Select the cell where you need to display the remarks of the first student. In our case, it’s cell C2, so click it on your spreadsheet.
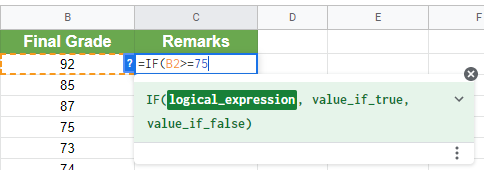
- At this point, we are now ready to initiate the
IF THENformula. To do so, type in ‘=IF(’. You’ll notice that the formula suggestions box will appear as you type in the formula. According to it, we’ll need to supply three parameters for the formula, namely, logical_expression, value_if_true, and value_if_false.

- For the first parameter (logical_expression), let’s specify the condition of our formula. We want to test if the value in cell B2 is greater than or equal to 75, so, type in ‘B2>=75’.
- After the condition, we can already indicate the values we need to display if the condition is met or not. For the value_if_true parameter, type in ‘“Passed”’. As for value_if_false, type in ‘“Failed”’.
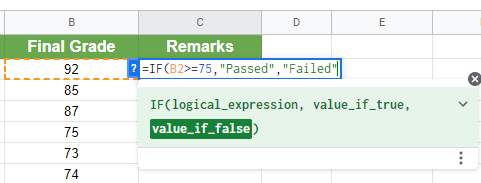
- Finalize the
IF THENformula by typing close parenthesis ‘)’. Once that’s done, hit Enter on your keyboard. You should see the spreadsheet update as follows:

- This time, let’s use the autofill feature of Google Sheets to complete the rest of the dataset. Select cell C2, then click and drag the small blue box on the bottom right corner over the succeeding cells.

Perfect! Now you know how to use the IF THEN formula in Google Sheets. A great thing about IF THEN is that you can utilize it along with other features of Google Sheets. Check out the next section to see how the IF THEN formula works with conditional formatting.
Using the IF THEN Formula with Conditional Formatting
The IF THEN formula of Google Sheets can be combined with other functions or features to give your spreadsheet presentation a boost. For instance, you can use Conditional Formatting Rules to change the color of the cells depending on the value returned by your IF THEN formula.
You can then use Conditional Formatting with IF THEN formula in your spreadsheet to achieve this look, or even better:
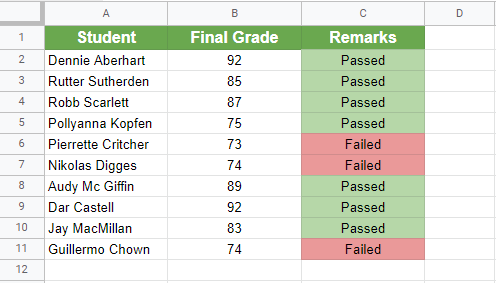
In the example above, I added conditional format rules to the Remarks column to fill the cell with green if the text contains “Passed”, and red otherwise.
That’s it when it comes to using the IF THEN formula in Google Sheets. It’s a very simple formula with so many useful applications. Make sure to use this formula whenever you need to evaluate conditional statements.
Do you want to learn more tricks and functions in Google Sheets? Check out our other articles.
Subscribe to our newsletter to receive more useful articles about Google Sheets.